"PhotoRobot" becentris stalas CL1300 ir CL850 vartotojo vadovas
Šis "PhotoRobot" becentris stalas CL1300 ir CL850 vartotojo vadovas skirtas padėti klientams, kurie neseniai įsigijo įrenginį. Yra CL1300 ir CL850 patefonų įrenginių apžvalga, įskaitant išsamią informaciją apie pagrindinius kiekvieno įrenginio komponentus ir pirmojo naudojimo bei sąrankos instrukcijas. Ši informacija padeda palengvinti pradinį "PhotoRobot" supratimą, pagrindinį testavimą ir veikimą.
Svarbus: Pradinį "PhotoRobot" sistemos diegimą visada turi atlikti įgaliota "PhotoRobot" institucija. Institucijos, turinčios leidimą įdiegti "PhotoRobot", yra patvirtintas platintojas arba paties gamintojo atstovas.
Nata: Prieš naudodami pirmą kartą, visada peržiūrėkite "PhotoRobot" saugos informaciją ir instrukcijas, taip pat vadovą, pateiktą specialiai su jūsų įrenginiu.
Becentris stalas CL1300 ir CL850 patefonų moduliai
Sveikiname ir dėkojame, kad įsigijote "PhotoRobot" stalą be centro! "PhotoRobot" atspindi dešimtmečius sukauptą patirtį ir inovacijas automatizuotos fotografijos srityje. Negana to, kiekviena sistema yra pritaikoma unikaliems jūsų verslo poreikiams, tuo pačiu užtikrinant visą paruoštų sprendimų ekosistemą "PhotoRobot" klientams. Tai reiškia, kad kai įjungiate "PhotoRobot", galite būti tikri, kad pasieksite įspūdingų rezultatų – lengvai, greitai ir nuosekliai kiekvienoje sesijoje. Sveiki atvykę į PhotoRobot.
1. Roboto aprašymas - becentris stalas CL1300, CL850
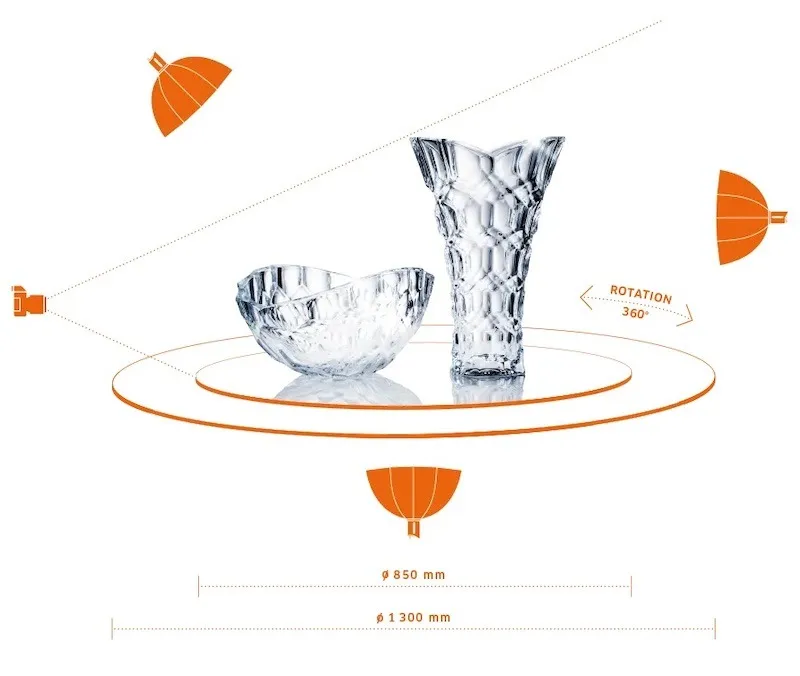
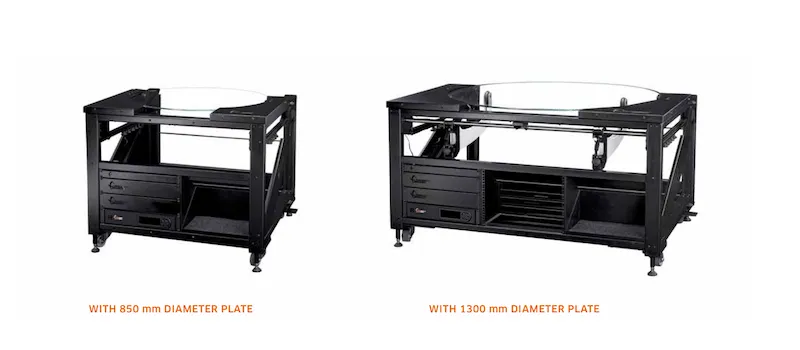
"PhotoRobot" becentris stalas yra dviejų modelių: didesnis CL1300 ir mažesnis CL850. Palyginimui, CL1300 turi didesnį rėmą, kuriame telpa dviejų skirtingų dydžių keičiamos plokštės: 1300 mm skersmens ir 850 mm skersmens. Tai leidžia naudoti bet kokio dydžio plokštelę įvairaus dydžio gaminiams palaikyti.
Tuo tarpu CL850 yra kompaktiškesnis su mažesniu rėmu, kuris palaiko tik vieno dydžio plokštę: 850 mm skersmens. Kitu atveju CL1300 ir CL850 turi identiškus technologinius komponentus ir funkcijas.
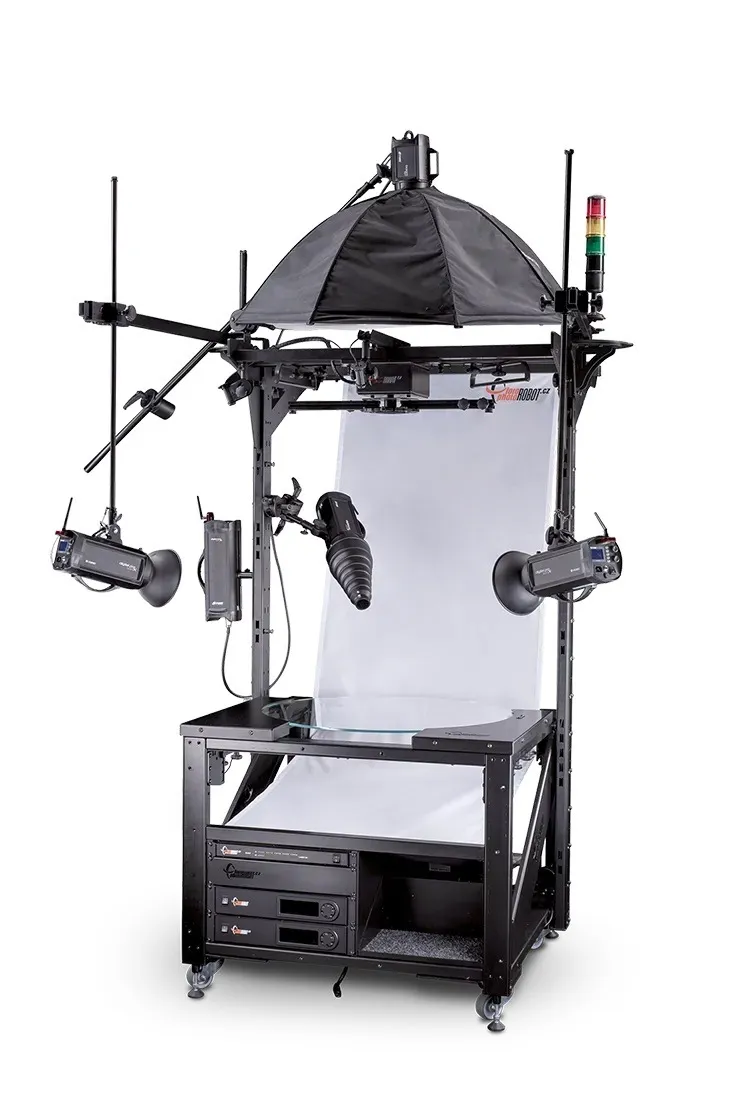
Pagrindiniai "PhotoRobot" becentrinio stalo technologiniai komponentai ir savybės:
- Optinė besisukanti stiklo plokštė vaizdui fiksuoti be šešėlių.
- Padėties nustatymo sistemos kalibravimas vienu mygtuko paspaudimu.
- Objektų nustatymas į sukimosi centrą naudojant lazeriu valdomą padėties nustatymą.
- Stambiu planu funkcija fotografuoti iš dalies arba visiškai padidintus objektus.
- Tvarkinga konstrukcija su žibintais ant laikiklių ir be laidų ant žemės.
- Vežimėlio ratukai lengvam transportavimui studijoje.
- Didelės reguliuojamos kojelės tiksliai darbinei plokštumai nustatyti.
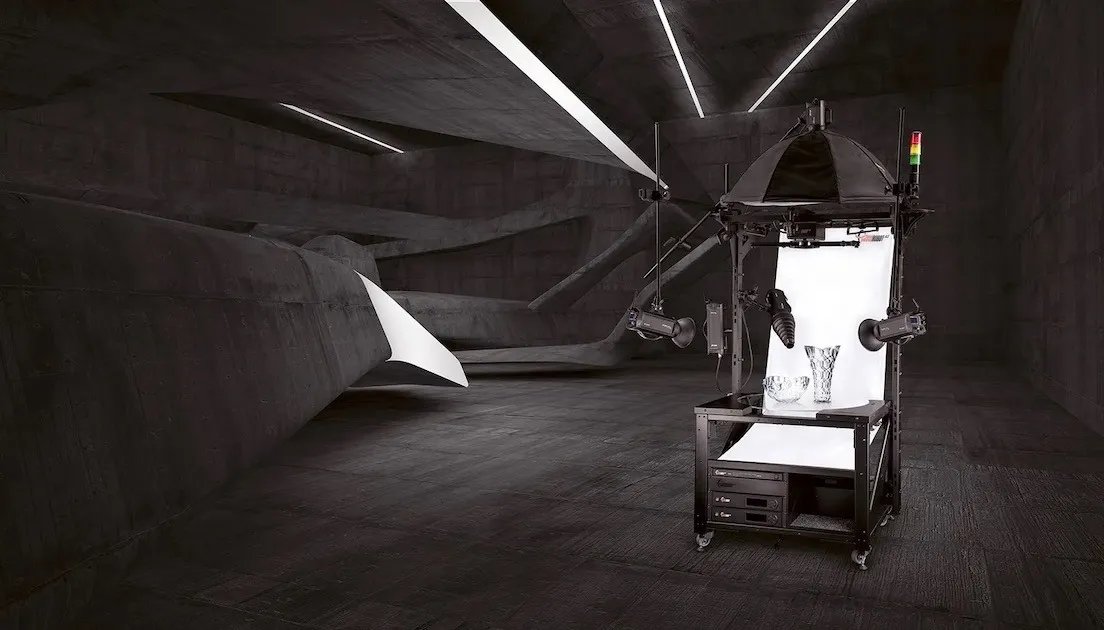
1.1. Studijos integracija - becentris stalas CL1300, CL850
Stalas be centro yra universalus fotografijos patefono sprendimas, skirtas mažų ir vidutinių gaminių fotografavimui be šešėlių. Juo siekiama pagreitinti, supaprastinti ir supaprastinti bet kokių fotografinių savybių turinčių objektų fotografavimą: skaidrių, blizgių, šviesių ir tamsių gaminių. Besisukanti stiklo plokštė gali pastatyti auskaro dydžio objektus iki bagažo, o išsklaidytas fonas leidžia fotografuojant apšviesti objektus iš visų pusių. Tai natūraliai sukuria aukštos kokybės nuotraukas grynai baltame fone. Jis taip pat palaiko greitesnį, automatizuotą vaizdų apdorojimą ir publikavimą.
1.2. Pagrindiniai stalo be centro komponentai
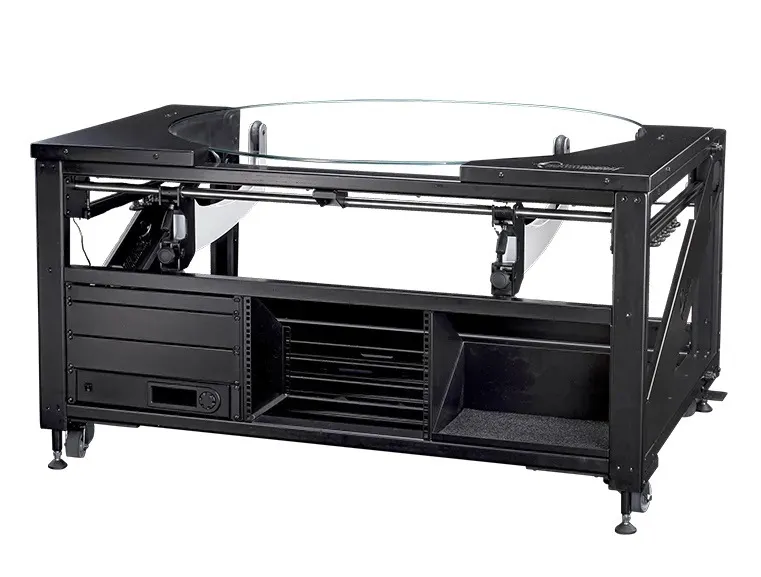
1.2.1. Vienintelis skirtumas tarp CL1300 ir CL850 yra mašinos korpuso rėmo plotis. Atkreipkite dėmesį, kad platesnis variantas yra viena didžiausių fotografijos patefonų darbo vietų rinkoje. Taip yra dėl didesnio modelio 1300 mm skersmens darbinio patefono ploto ir iki 40 kg keliamosios galios.
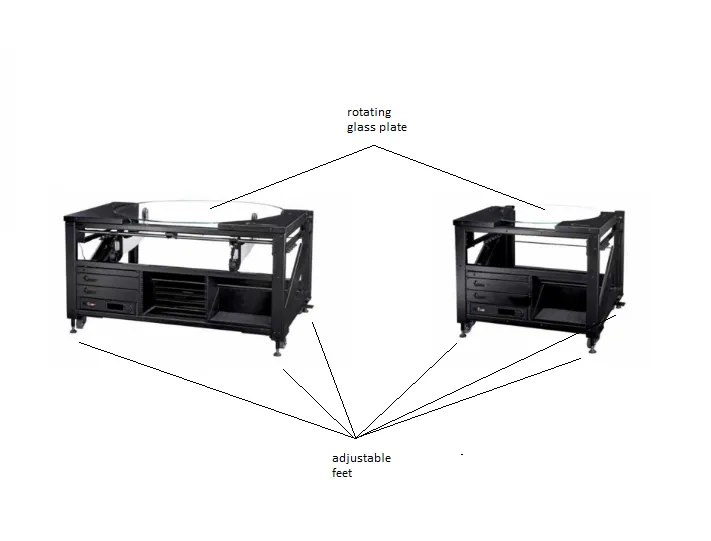
1.2.2. Abiejose "Centerless" stalo versijose yra besisukanti stiklo plokštė, kuri telpa į viršutinį įrenginio rėmo centrą. Tada mašinos apačioje yra reguliuojamos kojelės, skirtos tiksliai darbinei plokštumai nustatyti.
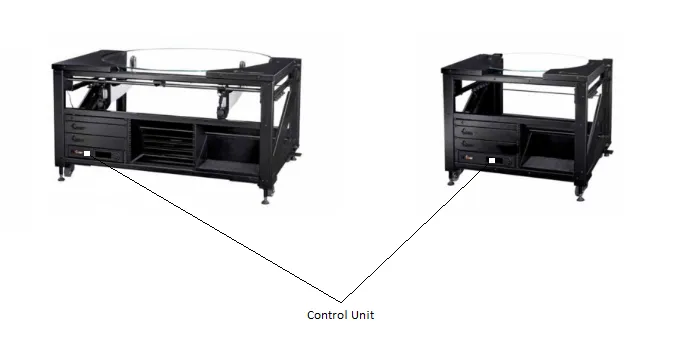
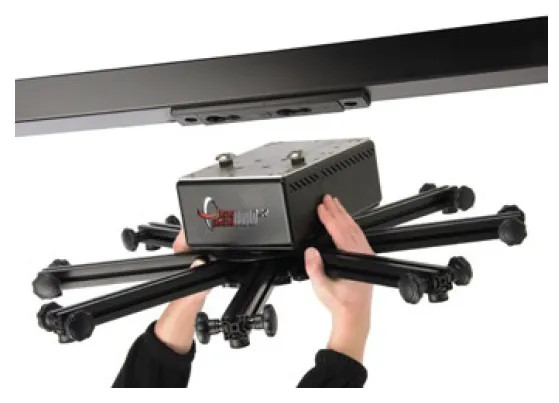
1.2.3. Stalo be centro valdymo blokas yra fiziškai sumontuotas specialioje "PhotoRobot HD" lentynoje priekinėje apatinėje kairėje mašinos rėmo lentynoje. Atkreipkite dėmesį, kad valdymo blokas yra neatsiejama įrenginio dalis. Jis įjungia ir valdo visus įrenginio judesius, taip pat suderinamus "PhotoRobot" robotus, naudojamus sukimosi fotografijai, pvz., "Robotic Arm", "MultiCam" ir "Cube" robotus.
1.3. Pasirenkamas robotinės rankos V8 išplėtimas
"PhotoRobot Robotic Arm V8" išplėtimas suderinamas su "Centerless Table CL1300" ir CL850 modeliais. Tai papildo "Arm V8" suderinamumą su daugeliu "PhotoRobot" rotacinių patefonų ir įrenginių, skirtų automatizuotai 360° fotografijai. Tai apima suderinamumą su "Cube", "Turning Platform", C klasės patefonais ir kitomis "PhotoRobot" sistemomis.
Jei naudojate CL1300 arba CL850 su "Robotic Arm V8" išplėtimu, technines instrukcijas apie įrenginio surinkimą, naudojimą ir pirmąjį naudojimą rasite " Robotic Arm V8" vartotojo vadove .
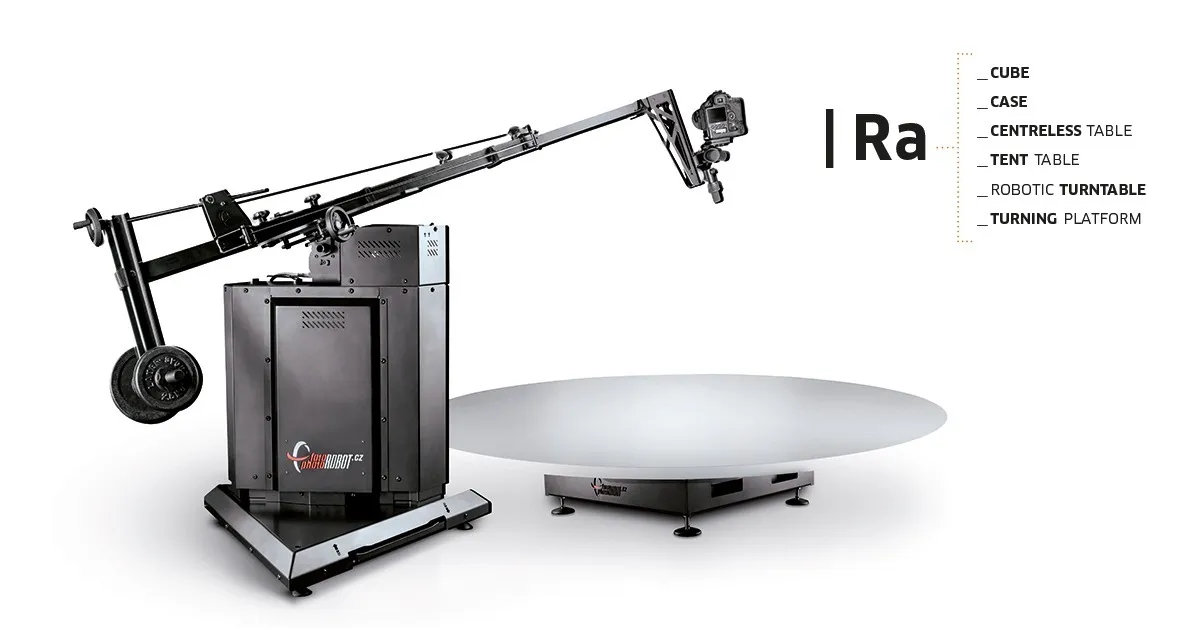
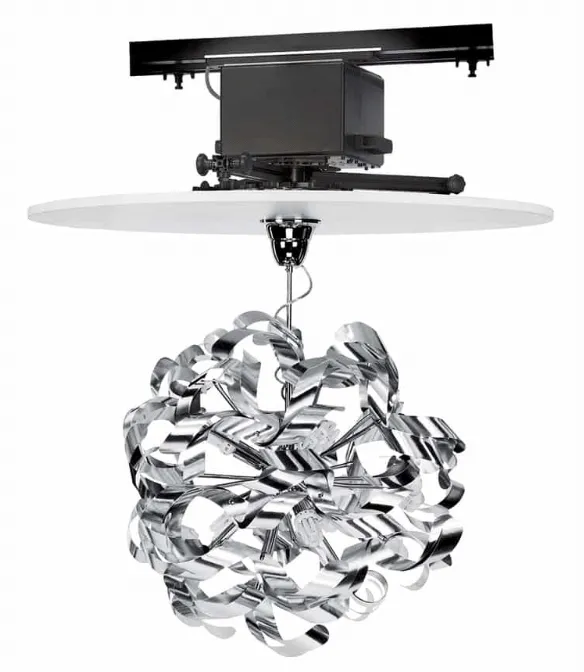
1.4. Pasirenkamas kubo roboto išplėtimas
Jei naudojate pasirenkamą "PhotoRobot Cube" išplėtimą su becentriu stalu, pirmiausia peržiūrėkite "PhotoRobot Cube" vartotojo vadovąview įrenginys, įskaitant surinkimo ir pirmojo naudojimo instrukcijas.
Nata: Kartu su becentriniu stalu "PhotoRobot Cube" pakabinamas prie viršutinio portalo pakabos režimu virš patefono. Tai leidžia pakabinti ore gaminius, tokius kaip rankinės, šviestuvai, šviestuvai ir daiktai, sveriantys iki 130 kg. Įrenginys sinchronizuoja daikto sukimąsi, patefono judėjimą, žibintus, fotoaparato fiksavimą ir kitus robotus, tokius kaip "PhotoRobot" robotinė ranka.
2. Prieš pirmą kartą naudojant stalą be centro
Prieš pirmą kartą naudojant "PhotoRobot Centerless Table", būtina suprasti, kad "PhotoRobot" yra modulinis įrenginys, susidedantis iš techninės ir programinės įrangos komponentų. Techniniu požiūriu tam reikia, kad "PhotoRobot" prisijungtų per tą patį tinklą, kaip ir jį valdantis kompiuteris. Be to, tinklas turi turėti interneto ryšį, kad būtų galima paleisti "PhotoRobot" paslaugas, kurios pasiekiamos debesyje.
Svarbus: Visada žiūrėkite "PhotoRobot First Use & Basic Testing", kad patvirtintumėte techninius naudojimo reikalavimus ir išsamias instrukcijas, kaip prijungti "PhotoRobot" prie tinklo.
Apskritai egzistuoja šie pagrindiniai eksploatavimo reikalavimai.
- Valdymo blokas turi prisijungti prie vietinio tinklo.
- Kompiuteris yra būtinas norint paleisti paslaugų GUI arba operatoriaus programinę įrangą, vadinamą _Controls.
- Kompiuteris turi prisijungti per tą patį tinklą kaip ir valdymo blokas.
- Tinkle turi būti veikiantis interneto ryšys.

Be to, prijungus "PhotoRobot" prie tinklo, būtina patikrinti elektros skirstymo sistemos parametrus (pvz., įtampą ir dažnį). Norėdami tai padaryti, naudokite RJ45 jungtį, esančią valdymo bloko gale. Jei valdymo bloko sąranka neatitinka reikalavimų, nustatykite jį surasdami rankinį tūrįtage parinkiklis valdymo bloko gale. Tada prijunkite valdymo bloką prie tinklo eterneto kabeliu naudodami RJ45 jungtį.

Tada būtina atitikti šiuos tinklo konfigūracijos reikalavimus, kad būtų galima naudoti lentelę be centro.
- DHCP serveris tinkle yra privalomas.
- Turi būti leidžiamas TCP prievadų 7777, 7778 ryšys.
- Turi būti leidžiamos UDP transliacijos 6666 prievade.
- Interneto ryšys yra privalomas.
- *. photorobot.com prieiga turi būti suteikta.
- as-unirobot.azurewebsites.net prieiga turi būti suteikta.
- Rekomenduojamas laidinis "PhotoRobot" prijungimas prie LAN.
- Žr. PhotoRobot Networking Būtinosios sąlygos ir konfigūracija, kad patvirtintumėte tinkamą sąranką ir prireikus pašalintumėte triktis.
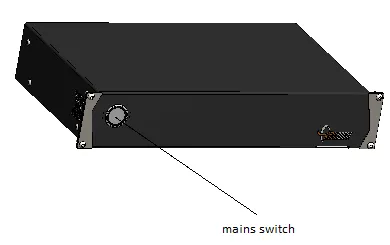
- Prijunkite maitinimo kištuką prie elektros lizdo.
Pabaigoje paspauskite valdymo bloko maitinimo jungiklį. Pasikeitus būsenai, lemputė pasikeis iš mirksinčios į pastovią lemputę, signalizuodama, kad valdymo blokas paruoštas darbui.
2.1. Raskite "PhotoRobot" IP adresą LAN
Norėdami rasti CENTERLESS TABLE arba bet kurio PhotoRobot įrenginio IP adresą, PhotoRobot Locator programa yra integruota tiesiogiai CAPP. Tai leidžia lengviau ieškoti ir identifikuoti valdymo blokus tinkle nenaudojant išorinių programų. Įsitikinkite, kad naudojate naujausią CAPP versiją, kad galėtumėte pasiekti šią funkciją.
Tada, norėdami identifikuoti robotą tinkle tiesiogiai CAPP, atidarykite vietinę CAPP versiją, eikite į Nustatymus ir spustelėkite Robotai / Valdymo blokai.
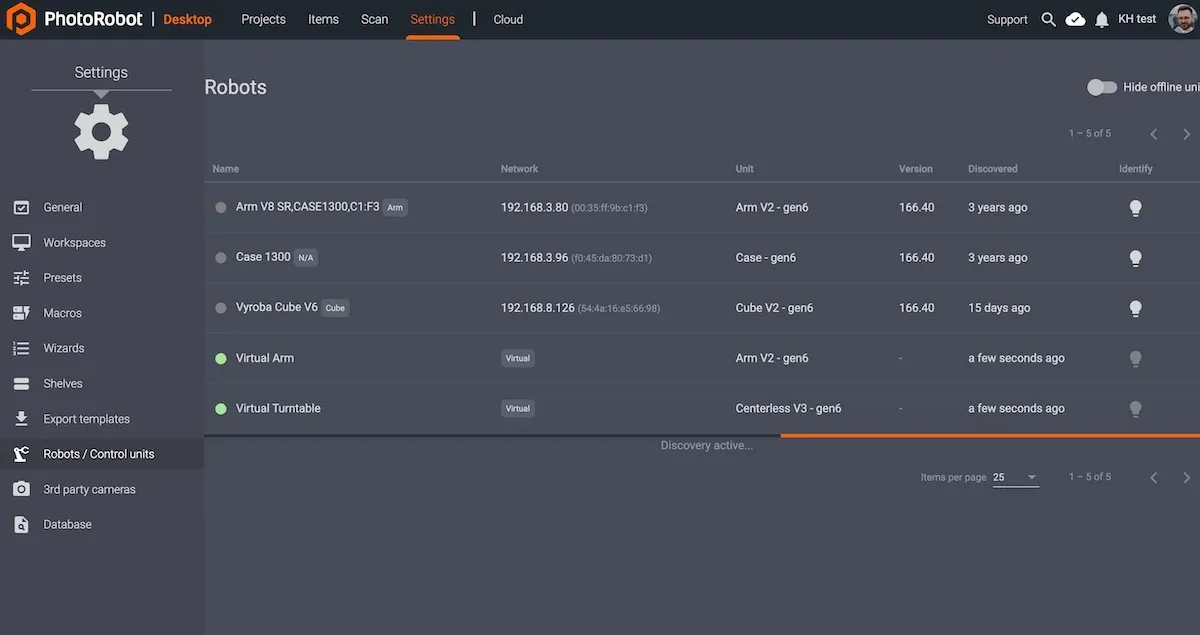
Meniu „Robotai / Valdymo blokai“ rodomi stulpeliai su pavadinimu, tinklu, bloku, versija, aptikimu ir identifikavimu kiekvienam robotui. Jei taškas kairėje roboto pavadinimo pusėje yra žalias, robotas yra prisijungęs. Spustelėjus roboto lauką, atsidarys roboto svetainės sąsaja. Tai taip pat privers roboto valdymo bloko LED lemputę mirksėti žaliai, kad būtų lengviau jį identifikuoti.
Jei klientui reikalingas išorinis programos atsisiuntimas, PhotoRobot Locator taip pat galima atsisiųsti iOS įrenginiams iš PhotoRobot paskyros atsisiuntimų.
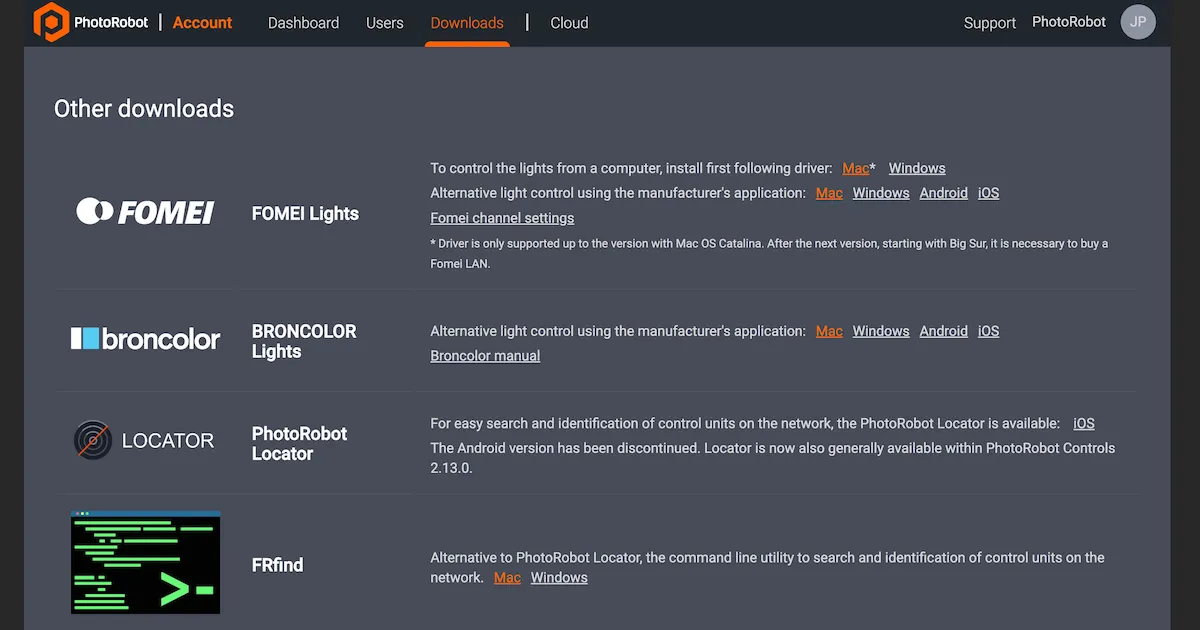
Pastaba: „PhotoRobot Locator“ „Android“ versija buvo nutraukta.
Arba yra FRFind komandinės eilutės įrankis, skirtas MacOS arba Windows, skirtas ieškoti tinkle ir identifikuoti PhotoRobot valdymo blokus. Nuorodas FRfind atsisiuntimui taip pat rasite PhotoRobot paskyros atsisiuntimų puslapyje.
Tada, suradę PhotoRobot įrenginį, nukopijuokite IP adresą ir įklijuokite PhotoRobot IP adresą į bet kurią žiniatinklio naršyklę URL formatu. Jei pavyks, bus paleista paslaugos GUI, kuri parodys pagrindinę vartotojo sąsają, skirtą PhotoRobot testavimui.
2.2. Atlikite pagrindinį stalo be centro testavimą
Atidarę aptarnavimo GUI, naudokite paprastus vartotojo sąsajos valdiklius, kad pirmiausia įjungtumėte variklį, o tada pasuktumėte platformą bet kokiu norimu kampu.
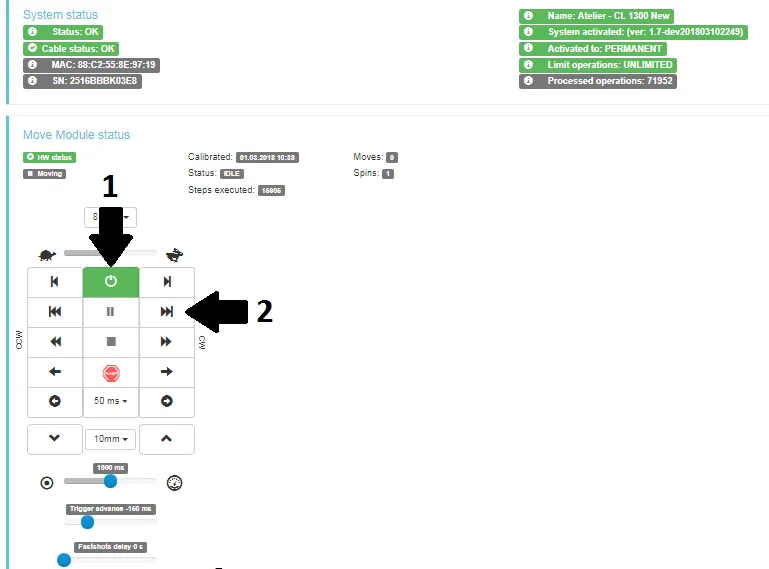
- Įjunkite variklius (rodyklė 1), pabandykite pasukti (rodyklė 2).
- Jei stiklo plokštė sukasi, jūsų "PhotoRobot Centerless Table" įrenginys yra paruoštas įprastam naudojimui.
3. PhotoRobot _Controls programinė įranga
Programinė įranga "PhotoRobot Controls App" ("CAPP") leidžia visiškai valdyti becentrį stalą CL1300 ir CL850 bei kitus "PhotoRobot" įrenginius. CAPP integruoja robotų, kamerų, studijos šviesų ir postprodukcijos valdymą. Tai apima darbo eigos valdymo funkcijas ir būtinas funkcijas efektyviam tolesnio apdorojimo automatizavimui.
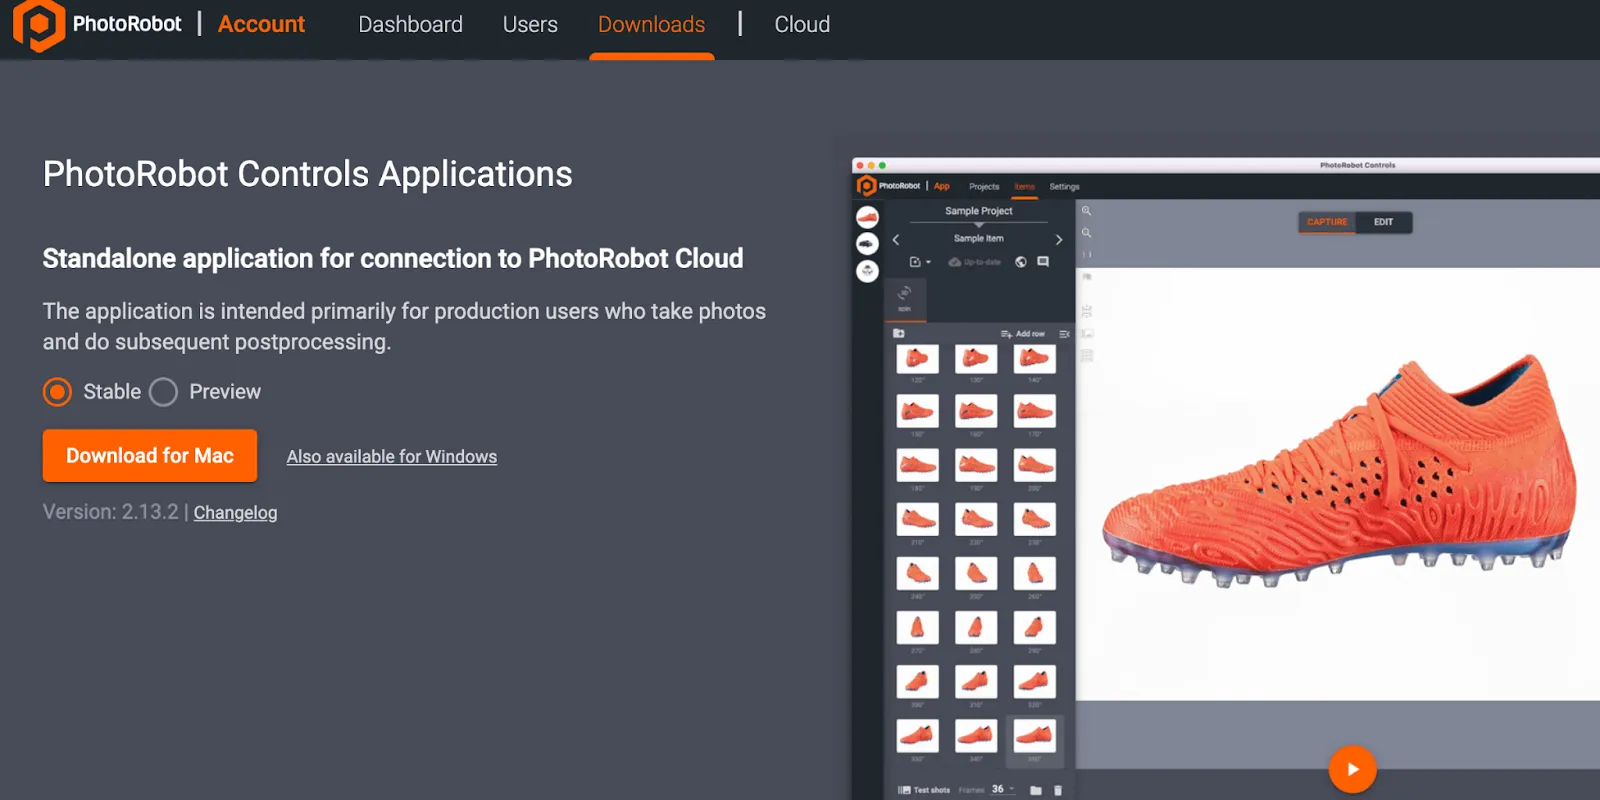
Svarbus: Atminkite, kad programinė įranga "PhotoRobot Controls" programėlė nėra įrenginio pristatymo dalis; tai yra atskiras pirkinys iš įrenginio. "PhotoRobot Controls" programėlę galima atsisiųsti per "PhotoRobot" paskyrą.
Nata: Paleidžiant po įdiegimo, atminkite, kad sąsaja gali automatiškai paleisti "vedlio režimu". Vedlio režimas yra supaprastinta vartotojo sąsaja, leidžianti tik nuskaityti brūkšninius kodus, kad būtų galima identifikuoti objektus ir automatiškai pradėti fiksavimo bei tolesnio apdorojimo sekas.
Išsamias instrukcijas ir palaikymą, kaip įdiegti ir naudoti "PhotoRobot Controls" programos programinę įrangą, rasite "PhotoRobot Getting Started" vartotojo vadove.
4. Informacinės etiketės
4.1. Simbolių apžvalga
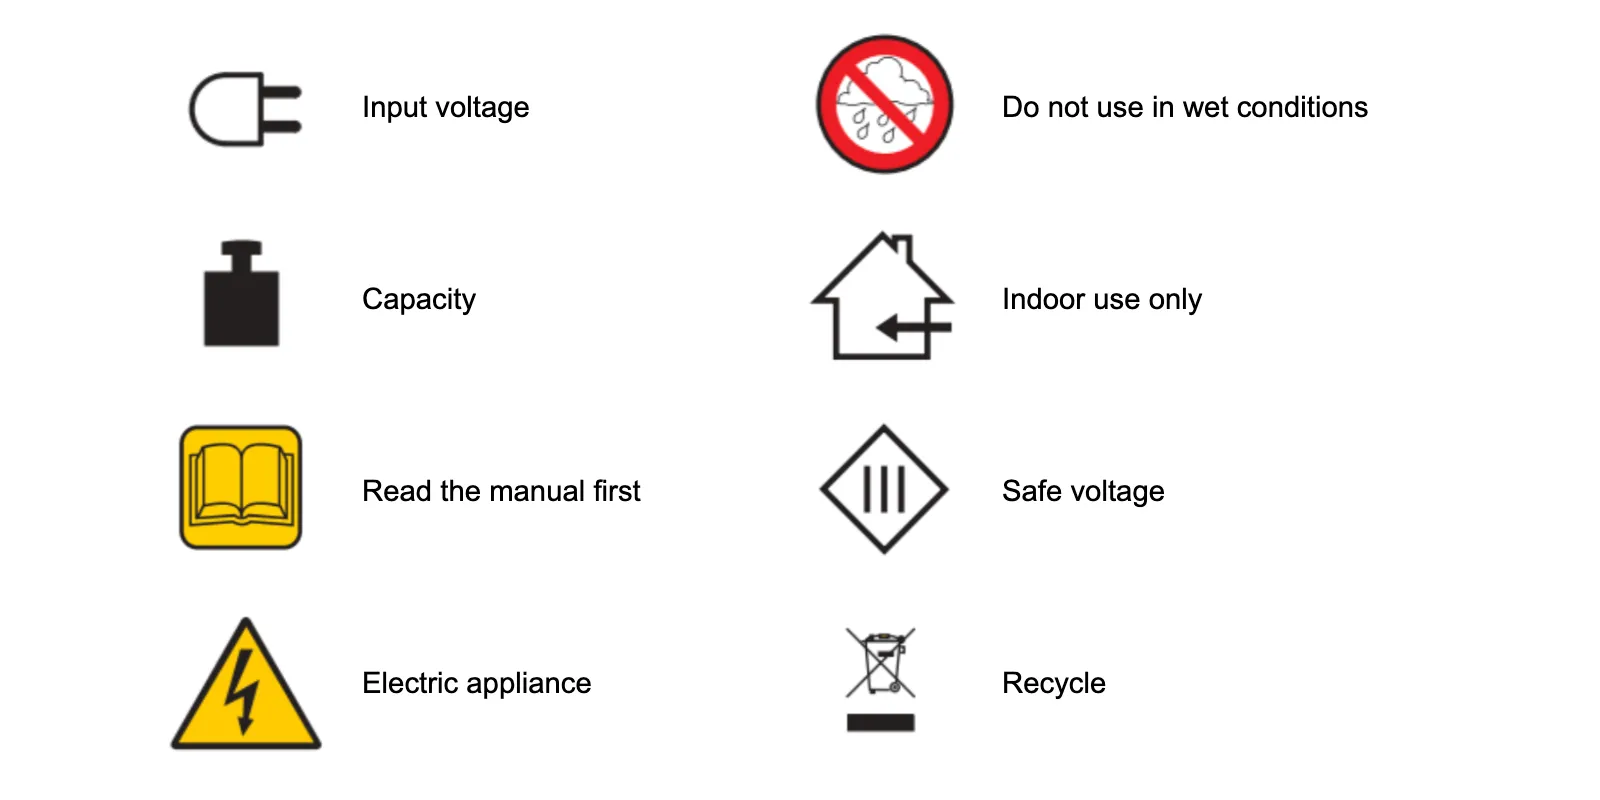
4.2. Mašinų ir komponentų etiketės
Konkrečių mašinų ir komponentų informacines etiketes rasite skyriuje Informacinės etiketės (3.1.) iš PhotoRobot saugos informacijos ir instrukcijų.


EOS sukilėlių serija


EOS DSLR serija


EOS M serija be veidrodžių


"PowerShot" serija


Iš arti / delninis

"Canon EOS Rebel" serija siūlo pradedantiesiems pritaikytus DSLR fotoaparatus su tvirta vaizdo kokybe, intuityviu valdymu ir universaliomis funkcijomis. Šie fotoaparatai, idealiai tinkantys fotografijos entuziastams, užtikrina patikimą automatinį fokusavimą, įvairaus kampo jutiklinius ekranus ir "Full HD" arba 4K vaizdo įrašymą.
Ryšys
Skiriamoji geba (MP)
Rezoliucija
"Canon EOS DSLR" serija užtikrina aukštos kokybės vaizdus, greitą automatinį fokusavimą ir universalumą, todėl idealiai tinka tiek fotografijai, tiek vaizdo įrašų gamybai.
Ryšys
Skiriamoji geba (MP)
Rezoliucija
"Canon EOS M Mirrorless" serija sujungia kompaktišką dizainą su DSLR panašiu našumu. Šios kameros su keičiamais objektyvais, greitu automatiniu fokusavimu ir aukštos kokybės vaizdo jutikliais puikiai tinka keliautojams ir turinio kūrėjams, ieškantiems perkeliamumo neprarandant vaizdo kokybės.
Ryšys
Skiriamoji geba (MP)
Rezoliucija
"Canon PowerShot" serija siūlo kompaktiškas, patogias kameras atsitiktiniams šauliams ir entuziastams. Su modeliais nuo paprastų taškų ir fotografavimo iki pažangių priartinimo kamerų, jie užtikrina patogumą, tvirtą vaizdo kokybę ir tokias funkcijas kaip vaizdo stabilizavimas ir 4K vaizdo įrašas.
Ryšys
Skiriamoji geba (MP)
Rezoliucija
"Canon" stambiu planu ir rankiniai fotoaparatai yra skirti detaliam, artimam fotografavimui ir vaizdo įrašams. Kompaktiški ir paprasti naudoti, jie siūlo tikslų fokusavimą, didelės skiriamosios gebos vaizdą ir universalias makrokomandų galimybes – puikiai tinka vaizdams rašyti tinklaraščius, fotografuoti produktus ir kurti stambiu planu.


