
Broncolor Siros 800 S WiFi / RFS 2 veikimo instrukcijos
Toliau pateiktos Broncolor Siros 800 S naudojimo instrukcijos yra oficialių gamintojo medžiagų kopija, kad PhotoRobot klientai galėtų greitai juos peržiūrėti. Šios medžiagos skirtos palaikyti pradinį supratimą ir nepriklausomą jų Broncolor Siros 800 S įrenginio veikimą. Tačiau atkreipkite dėmesį, kad Broncolor šviesos valdomos tiesiogiai per PhotoRobot _Controls programėlę. Tai užtikrina, kad nereikės įdiegti Broncolor aparatinės įrangos valdymo tvarkyklių kliento pusėje.
Techninę informaciją apie aparatūros komponentus, programinės įrangos įrankius, pagrindinius režimus ir rekomenduojamus nustatymus Broncolor lempoms su PhotoRobot rasite PhotoRobot – Broncolor Lights Management svetainėje.
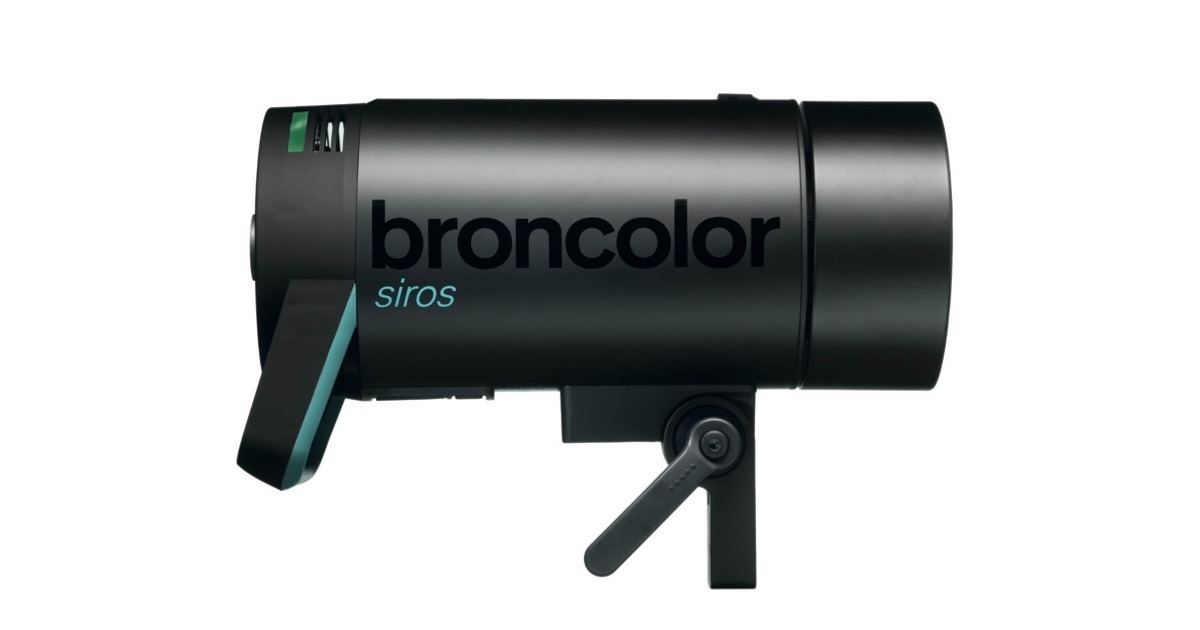
Pastaba: Šios naudojimo instrukcijos yra oficialių gamintojo Broncolor Siros 8 S serijos studijinių šviestuvų veikimo instrukcijų kopija. Originalią dokumentaciją apie jūsų konkretų produktą rasite gamintojo svetainėje broncolor.swiss . Tuo pačiu metu būtinai laikykitės visų instrukcijų, pateiktų specialiai su jūsų įrenginiu prieš pirmą naudojimą.
Valdikliai ir ekranai
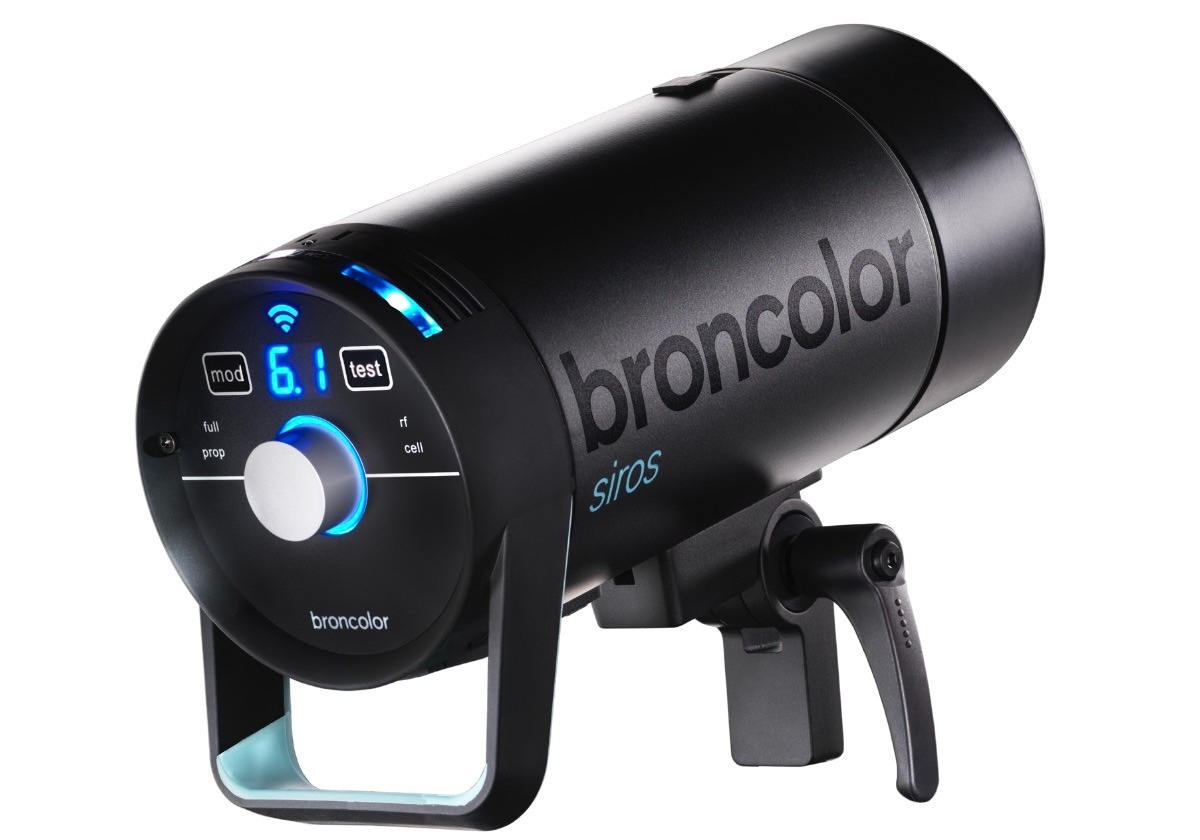
Broncolor Siros 800 S valdikliai ir ekranai yra tokie.
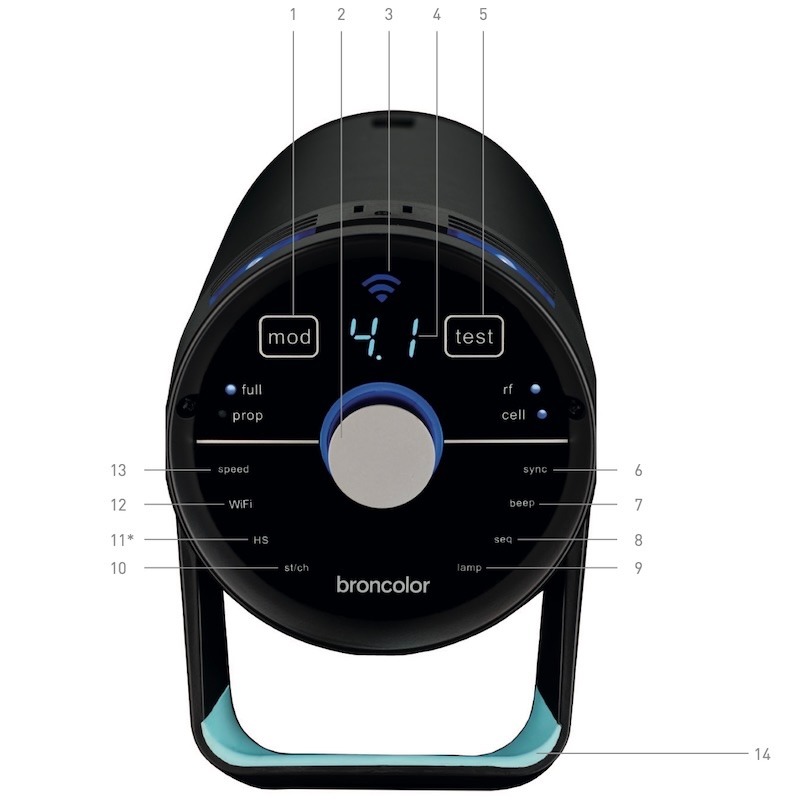
- Modeliavimo šviesa įjungta/išjungta
- Rotacinis valdiklis
- WiFi ekranas
- Skaitmeninis energijos paskirstymo ekranas
- "Testo" raktas
- Meniu nustatymai
- Meniu nustatymai
- Meniu nustatymai
- Meniu nustatymai
- Meniu nustatymai
- Meniu nustatymai
- Meniu nustatymai
- Meniu nustatymai
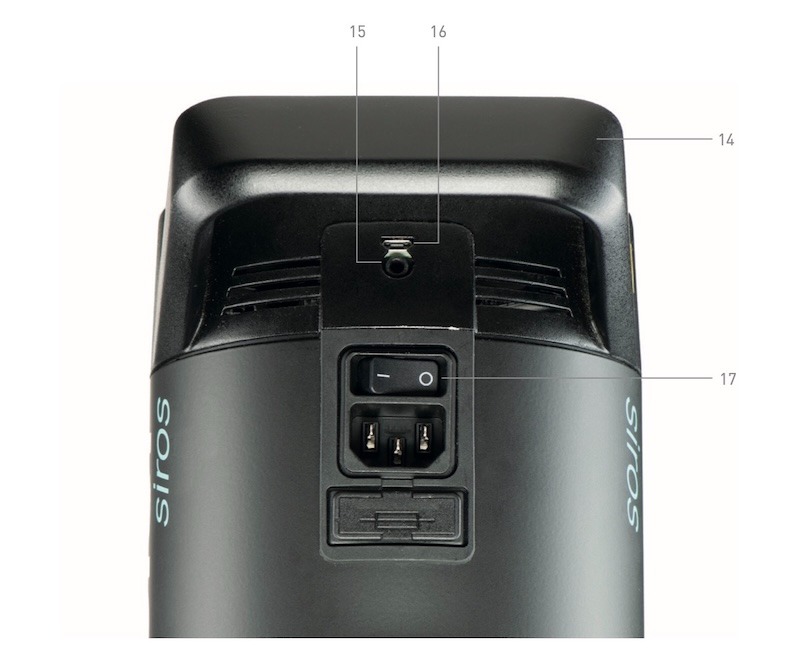
- Rankena
- Sinchronizavimo lizdas
- Mini USB
- Tinklo jungiklis
Prieš naudojimą
Broncolor Siros S yra aukštos kokybės produktas, kuris, tinkamai naudojamas, tarnauja daugelį metų. Būtinai atidžiai perskaitykite visą informaciją šiose naudojimo instrukcijose, kuriose taip pat pateikiamos svarbios instrukcijos prietaiso naudojimui ir priežiūrai. Nukreipkite kitus vartotojus į šias instrukcijas, kad nauji vartotojai susipažintų su įrenginiu, jo naudojimu ir priežiūra. Be to, visada atkreipkite dėmesį į saugos instrukcijas, pateiktas atskirai jūsų įrenginiui iš Broncolor.
Turinys
- Tiekimo apimtis
- Pirmasis startuolis
- Valdymo elementai
- Pagrindinio meniu funkcijų apžvalga
- Meniu navigacija
- Blykstės laikų valdymas
- Išleidimas
- HS funkcija
- Specialios funkcijos
- Informacija ir klaidos pranešimai
- DUK
- Priedai
- Priežiūra / remontas
- Aplinkos apsaugos informacija
- Garantija ir pranešimas JK klientams
- Techniniai duomenys
1. Tiekimo apimtis
1.1. Siros 800 S WiFi / RFS 2 – 31.643.XX
Pirmiausia įsitikinkite, kad pristatymo metu gavote šiuos daiktus.
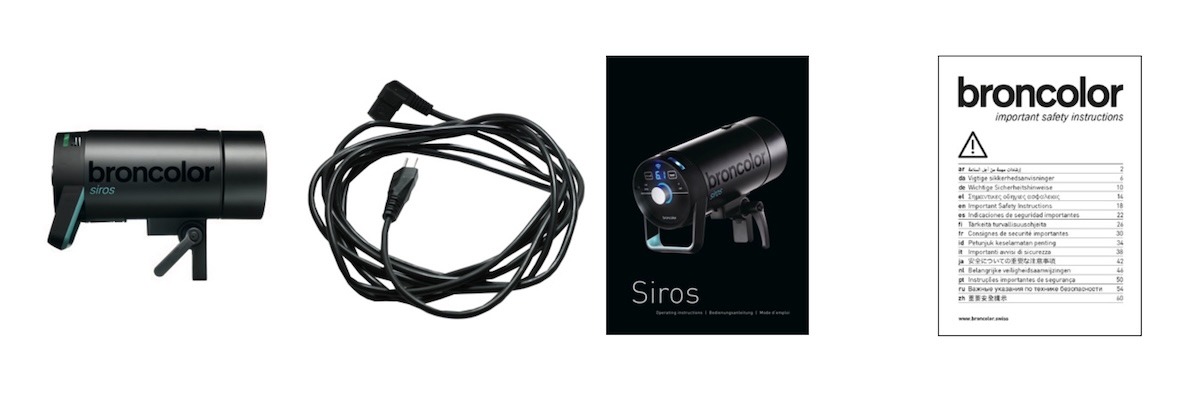
- Siros S monolight
- Tinklo kabelis
- Veikimo instrukcijos (BA109.00)
- Svarbios saugos instrukcijos (WA-18-1)
1.2. Rinkiniai
Siros ekspertų rinkinio turinys apima:
- 2× Siros 800 S WiFi / RFS 2
- 1× Skėtis, 85 cm (33.574.00)
- 1× Softbox 60 x 60 (33.561.00)
- 1× Greičio žiedas (33.401.00)
- 2× Jaunimo tribūna AC (35.100.00)
- 1× Flash Bag 2 (36.532.00)
- 1× Priedų krepšys (36.535.00)
- 1× Sinchronizacijos kabelis (34.111.00)
Siros Pro Kit turinys apima:
- 3× Siros 800 S WiFi / RFS 2
- 1× Softbox 60 x 60 (33.561.00)
- 1× Octabox 75 (33.600.00)
- 2× Greičio žiedas (33.401.00)
- 2× L40 standartinis reflektorius (33.115.00)
- 3× Jaunimo tribūna AC (35.100.00)
- 1× Flash Bag 3 (36.533.00)
- 1× Priedų krepšys (36.535.00)
- 1× Sinchronizacijos kabelis (34.111.00)
2. Pirmasis startuolis
2.1. Apsauginio dangtelio nuėmimas
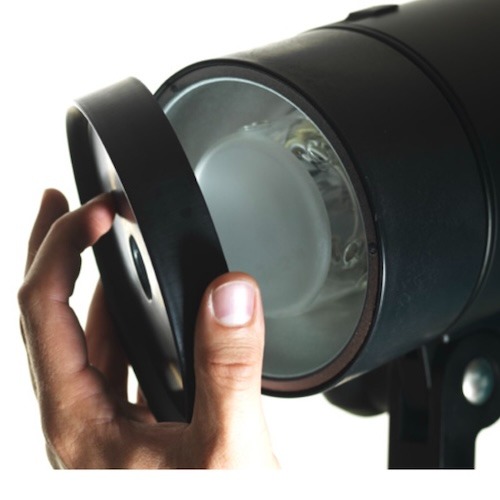
2.2. Jungiamasis tinklo laidas
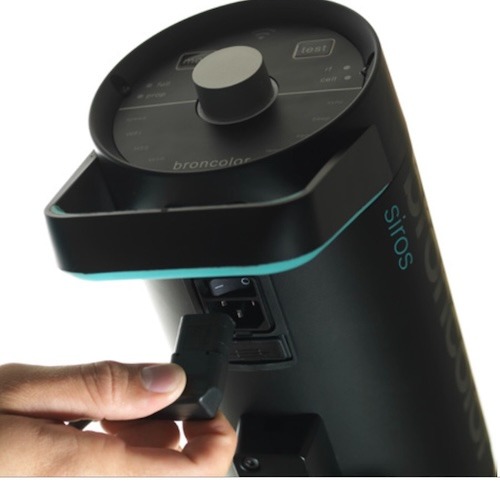
2.3. Įjunkite įrenginį pagrindiniame jungiklyje
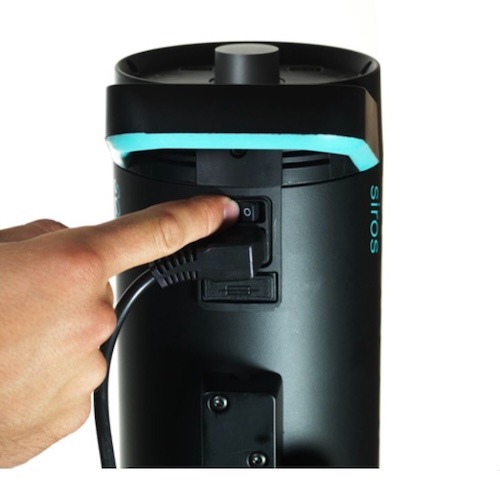
3. Valdymo elementai
3.1. Elementų funkcijos
Rotacinis valdiklis (2)

- Rotacinis valdiklis (2) veikia įrenginio įjungimui ir išjungimui (budėjimo režimu). Paspaudus sukamąjį valdiklį 3 sekundes, įrenginys perjungiamas į budėjimo režimą.
- Meniu rotacinis valdiklis leidžia naršyti meniu ir patvirtinti meniu elementus. Papildomas meniu navigacijos paaiškinimas pateiktas 5 skyriuje.
- Veikimo metu sukamasis valdiklis keičia blykstės energiją. Sukant prieš laikrodžio rodyklę blykstelės energija mažėja, o sukant pagal laikrodžio rodyklę ji didėja. Tuo tarpu valdiklio sukimas lėtai keičia jį 1/10 f-stop žingsniais, o greitas ("sukimas") – 1/1 f-stop žingsniais.
Informacijos ekranas (4)
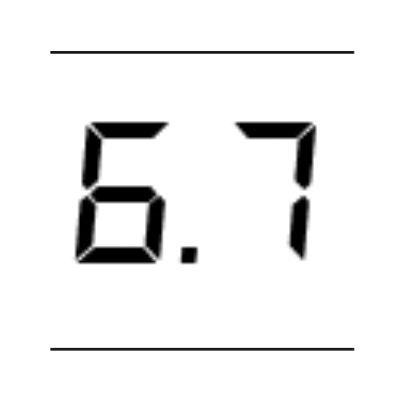
- Informacinis ekranas (4) rodo pasirinktą blykstės energiją arba meniu pasirinkimo parinktis.
Modifikacija – modeliavimo lemputė ĮJUNGTA / IŠJUNGTA (1)
- Naudokite "mod" (1), kad įjungtumėte arba išjungtumėte modeliavimo lempą. Ilgesnis mygtuko paspaudimas pakeičia veikimo režimą iš "pilno" į "rekvizitą" arba atvirkščiai.
Testas (5)

- Naudojant "test" (5) prasidės testas. "Ready" ekranas aplink rotacinį valdiklį pasikeičia į mėlyną vos tik įkrovimo/iškrovimo operacija baigiama.
3.2. Meniu funkcijos
Greitis (13)
- " Greičio" (13) meniu nustatymas skirtas greitam įkrovimui ir mirksėjimo laikams. Daugiau paaiškinimų rasite šių instrukcijų 6 skyriuje.
WiFi (12)
- "WiFi" (12) reiškia, ar WiFi yra įjungtas, ar išjungtas.
HS (11)

- "HS" reiškia, ar HS įjungtas, ar išjungtas.
Studija / kanalas (10)
- Meniu nustatymas "st / ch" (10) skirtas studijos / kanalo keitimui. Naudokite jį, kad perjungtumėte esamą studijos kanalą (RFS 2).
Lempa (9)

- Naudokite meniu nustatymų lempą (9), kad pasirinktumėte lempos kanalą (RFS 2).
Seka (8)
- Meniu nustatymas "seq" (8) parenka mirksėjimo skaičių.
Pypt (7)
- " Beep" (7) meniu funkcija rodo, ar akustinis "Paruošta" įspėjimas įjungtas ar išjungtas.
Sinchronizacija (6)
- Naudojant "sinchronizaciją" (6) galima pasirinkti skirtingus atleidimo būdus (fotocėlė, radijas, fotocelelė ir/arba radijas).
Sinchronizacijos lizdas / mini USB (15 / 16)
- Naudokite meniu funkcijas Sync socket / Mini USB (15 / 16) išleidimui per sinchronizavimo laidą arba programinės įrangos atnaujinimui per mini USB.
Įjungta/išjungta (17)

- Naudokite įjungimą/išjungimą (17) įrenginyje, kad jį įjungtumėte arba išjungtumėte.
4. Pagrindinių funkcijų apžvalga
Pagrindinės funkcijos yra šios.
- Norėdami patekti į pagrindinį meniu, paspauskite rotacinį valdiklį (2).
- Pasukite sukamąjį valdiklį (2) pagal laikrodžio rodyklę arba prieš laikrodžio rodyklę, kad pasiektumėte reikiamą meniu punktą.
- Norėdami patvirtinti pasirinkimą, dar kartą paspauskite rotacinį valdiklį (2). Pasirinktas meniu elementas pradeda mirksėti.
5. Meniu navigacija
Broncolor Siros 800 S meniu funkcijos apima:
- Greitis
- WiFi
- HS
- st/ch
- Lempa
- seq
- pypt
- sinchronizacija
Paspaudus rotacinį valdiklį (2), patenkate į pagrindinį monošviesos meniu. Iš ten turite prieigą prie įvairių funkcijų.
Atkreipkite dėmesį: jei meniu punkto negalima pasirinkti, pavyzdžiui, su kitais produktais nei Siros 800 S, įrenginys šios funkcijos nepalaiko.
Pavyzdys: Nustatykite 15 blyksnių seką kiekvienam leidimui.
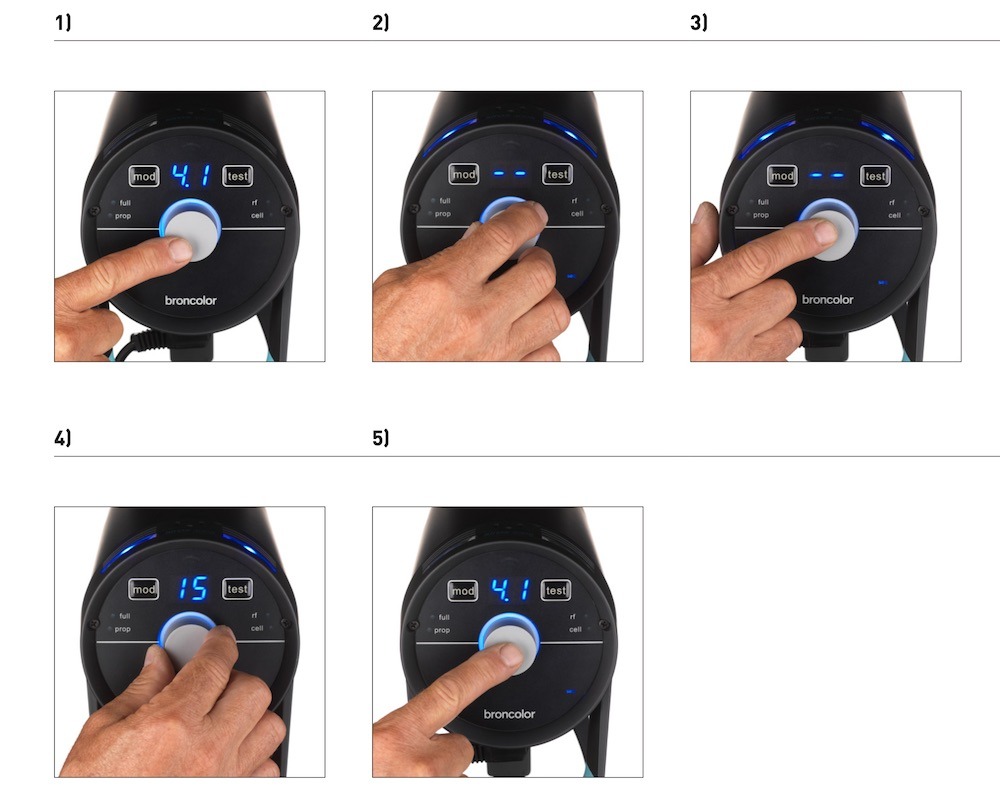
- Paspauskite sukamąjį valdiklį (2), kad patektumėte į pagrindinį meniu. Paskutinis pasirinktas meniu elementas bus rodomas. Pagrindinis ekranas keičiasi iš rodomos išvesties galios į pasirinktą meniu elementą.
- Sukiokite rotacinį valdiklį (2), kol pasieksite meniu elementą "seq".
- Paspauskite sukamąjį valdiklį (2), kad patvirtintumėte šią funkciją. "Seq" ekranas pradeda mirksėti.
- Sukite sukamąjį valdiklį (2), kol pagrindiniame ekrane pasirodys "15".
- Patvirtinkite šį pasirinkimą paspausdami sukamąjį valdiklį (2). Po šio patvirtinimo įrenginys pereina į įprastą būseną. Jei pasirinkimas nepatvirtintas per 5 sekundes, įrenginys pereina į įprastą būseną nekeisdamas nustatymo.
6. Blykstės laiko valdymas
Pagrindiniame meniu galite nustatyti monošviesos blyksnio laiką į "greitį". Šis nustatymas apskaičiuoja greičiausią galimą blyksnio laiką pasirinktam energijos lygiui. Tai taip pat gali sukelti blykstės spalvos šiek tiek pasislinkimą link mėlynos srities.
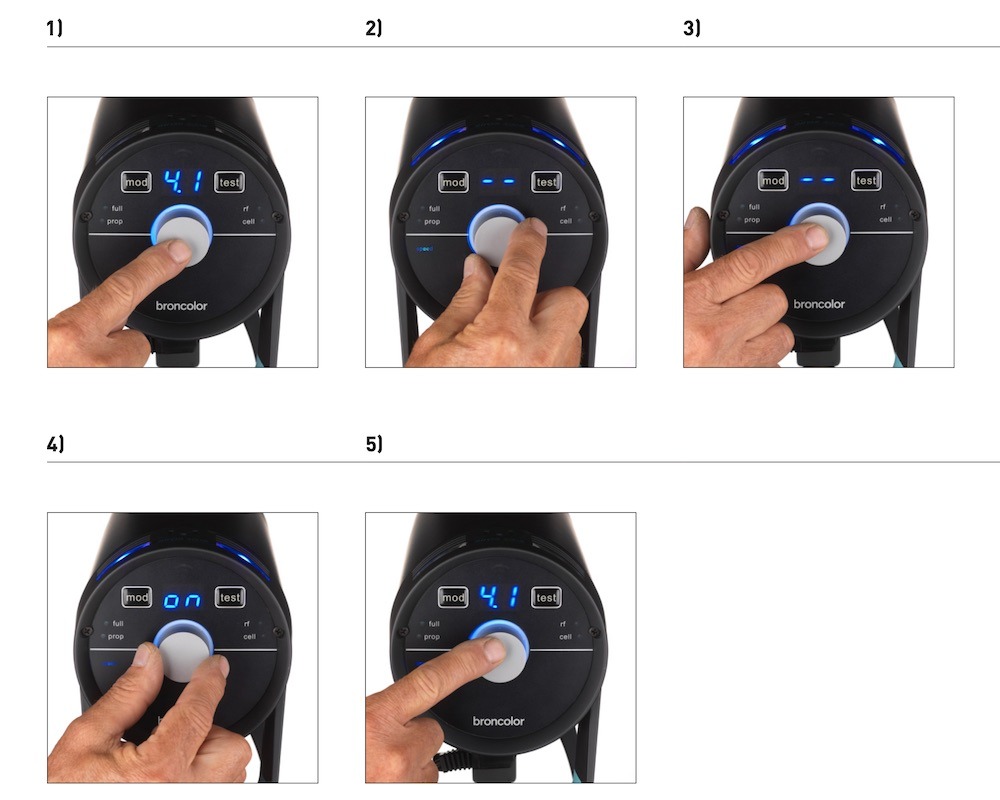
- Paspauskite rotacinį valdiklį (2), kad patektumėte į pagrindinį meniu.
- Sukiokite rotacinį valdiklį (2), kol pasieksite meniu daikto "greitį".
- Patvirtinkite šį pasirinkimą paspausdami sukamąjį valdiklį (2).
- Naudokite rotacinį valdiklį (2), kad pasirinktumėte parinktį "įjungta" arba "išjungta".
- Patikrinkite tai su rotaciniu valdikliu (2).
7. Išleidimas
7.1. RFS 2 modulis (radijo dažnių sistema)
RFS 2 blykstės valdymui kanalas (studijos adresas) turi atitikti siųstuvo kanalą. Studijos adresas meniu nustatomas pozicijoje "st". Lempos kanalas apibrėžtas meniu po "lamp". Daugiau informacijos apie pažinimo šviesų spalvų keitimą rasite 9.3 skyriuje.
Su radijo siųstuvu-imtuvu galite apibrėžti ir nustatyti atskiras lempas kaip norite. Norėdami sužinoti, kaip tai padaryti, žiūrėkite transiverio naudojimo instrukcijas. Siųstuvas-imtuvas nėra standartiškai komplektuojamas su atskiromis galvutėmis.
7.2. Fotocelelė (ląstelė)
Fotocelę galima įjungti ir išjungti naudojant meniu funkciją "sync" (6). Kai ji aktyvi, šalia "cell" žymos užsidega mėlynas LED diodas. Po pirmojo sekos blyksnio aktyvus fotoelementas deaktyvuojamas, o mėlynas LED šalia "sync" klavišo (6) mirksi. Paspaudus "test" klavišą, jis vėl įsijungia.
7.3. Sinchronizacijos lizdas (15)
Sinchronizaciniai kabeliai – 5 m (16,4 pėdos) (Art. Nr. 34.111.00) ir 10 m (32,8 pėdų) (34.112.00) – gali būti pritvirtinti prie lizdo kabelio atlaisvinimui (15).
7.4. "testo" raktas (5)
Naudojant šį klavišą, monošviesą galima įjungti rankiniu būdu. Blykstė gali būti įjungta, kai pasiekiama 70 % nustatyto energijos lygio. Vizualus "Paruošta" indikatorius, priešingai, užsidega tik pasiekus 100 %.
8. HS funkcija
Kartu su RFS 2.2 siųstuvu galite naudoti Siros 800 S monolight su itin greitais užrakto greičiais. Pavyzdžiui, esant aplinkos šviesai, net ir visiškai atidarius diafragmą (selektyvus fokusavimas), vaizdas gali būti tinkamai pereksponuotas iki 1/8000, o Siros vis tiek leidžia nustatyti dominuojančius ir kūrybingus šviesos efektus.
Tam tereikia RFS 2.2 siųstuvo, kuris prieinamas Canon, Fuji, Nikon ir Sony fotoaparatams. Be to, HS turi būti aktyvuotas visuose Siros įrenginiuose. Tai keičia blykstės kreivę ir kartu su RFS 2.2 garantuoja teisingą ekspoziciją be apribojimų jūsų pasirinktam užrakto greičiui.
Norėdami sužinoti daugiau apie optimalų HS funkcijos panaudojimą, perskaitykite RFS 2.2 siųstuvo veikimo instrukcijas.
Dirbant HS režimu, su Siros gali naudoti tik blykstės galią nuo 4 iki 10 lygio.
9. Specialios funkcijos
9.1. Atstatymas (į gamyklinius nustatymus)
Paspauskite "test" klavišą (5) 4 sekundes. Tai atstato visas funkcijas į gamyklinius nustatymus. Atstatymas patvirtinamas dvigubu pyptelėjimu.
9.2. "bronControl" programėlė ir WiFi nustatymai
Norėdami valdyti savo Siros monolight, taip pat galite nemokamai atsisiųsti "bronControl" programėlę. Norėdami rasti programėlę, ieškokite "bronControl" Apple App Store arba Google Play Store.
9.2.1. Veikimo režimai
9.2.1.1. Veikimas "Privatus" režimas (gamyklinis nustatymas)
Jei WiFi režimas aktyvuojamas daugiau nei viename monošviesoje, visi šie įrenginiai automatiškai susijungia su tuo pačiu studijos adresu ir sudaro privatų tinklą. Tuomet prie šio tinklo turi būti prijungtas išmanusis telefonas arba planšetė, kad jį būtų galima valdyti. Norėdami tai naudoti, įjunkite WiFi funkciją savo išmaniajame telefone ar planšetėje. Jūsų įrenginys automatiškai ieškos galimų WiFi tinklų. Prijunkite savo išmanųjį telefoną ar planšetę prie atitinkamo Bron-Studio tinklo. Prisijungimo slaptažodis yra: bronControl. Dabar paleiskite "bronControl" programėlę savo įrenginyje. Įveskite atitinkamą studijos numerį po "pridėti naują studiją" ir prijunkite programėlę prie šios studijos. Daugiau instrukcijų apie veikimą rasite naudodamasis pagalbos funkcija "?" programėlėje.
9.2.1.2. Veikimas "Enterprise" režimu
Jei yra esamas WiFi tinklas (maršrutizatorius), įrenginį galima integruoti į šį tinklą naudojant išmanųjį telefoną arba planšetę. Norėdami tai pasiekti, programėlėje "bronControl", nustatymuose, eikite į "Tinklo nustatymus" ir įveskite maršrutizatoriaus nustatymus "enterprise" režimu. Įsitikinkite, kad įrenginiai nustatyti teisingu studijos adresu. Siros išsaugo paskutinį ryšio tipą ir bando prisijungti prie paskutinio tinklo kitą kartą, kai jis paleidžiamas.
9.2.2. Meniu nustatymai
Meniu nustatymai apibrėžti taip: įjungta / išjungta / sinchronizuoti (įjungta / -- / sy).
9.2.3. WiFi ekranas (3) įrenginyje
Simboliai ir jų aprašymai Wifi ekranui (3) įrenginyje yra tokie.
9.3. Kognicijos šviesos
Pasirinkus įvairius lempų kanalus (zonas), pažinimo šviesa įrenginio viršutiniame paviršiuje keičia spalvą. Tai skirta atskirti atskirus įrenginius, kai jie valdomi "bronControl" programėle. Lemputė įrenginyje keičia spalvą, kai programėlė aktyvuojama išmaniajame telefone ar planšetėje arba kai paspaudžiamas sukamasis valdiklis; išėjus iš meniu ji vėl tampa mėlyna.
Lempos kanalų spalvos yra tokios.
10. Informacija ir klaidos pranešimai*
10.1. Akustiniai signalai
Akustiniai signalai yra pyptelėjimas arba dvigubas pyptelėjimas.
10.2. Pranešimas ekrane
Pastaba: *Klaidų pranešimai visada taip pat žymimi raudona kognityvine lempa.
11. DUK
11.1. Blykstės vamzdelių keitimas
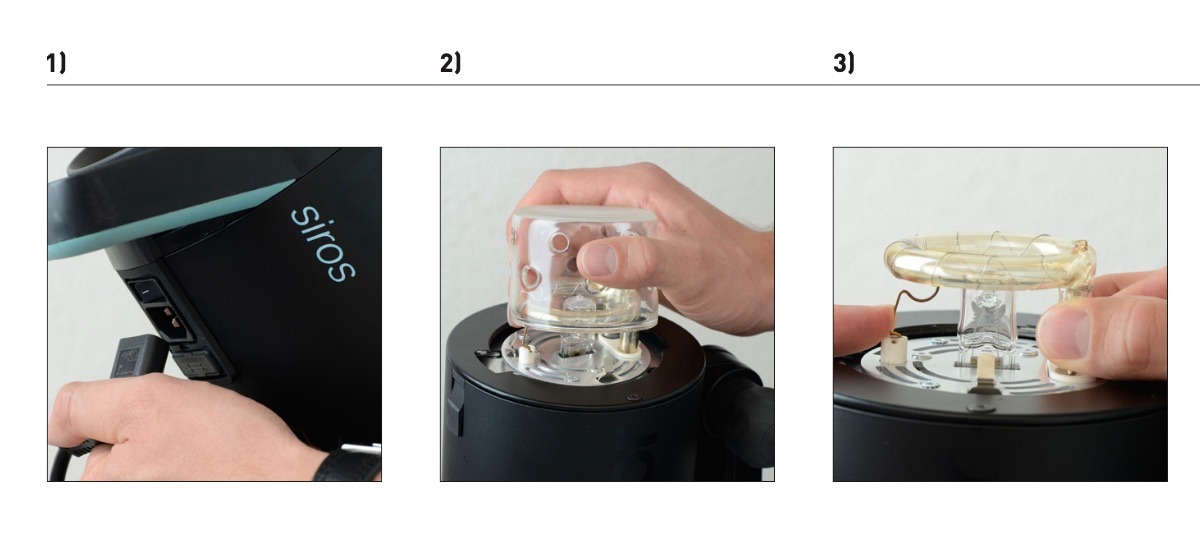
- Atjunkite tinklo laidą nuo įrenginio.
- Nuimkite apsauginį stiklą ištraukdami jį iš fiksuojančių spaustukų.
- Paspauskite kontaktinę spyruoklę žemyn ir atsargiai ištraukite blykstės vamzdelį.
11.2. Saugiklio keitimas
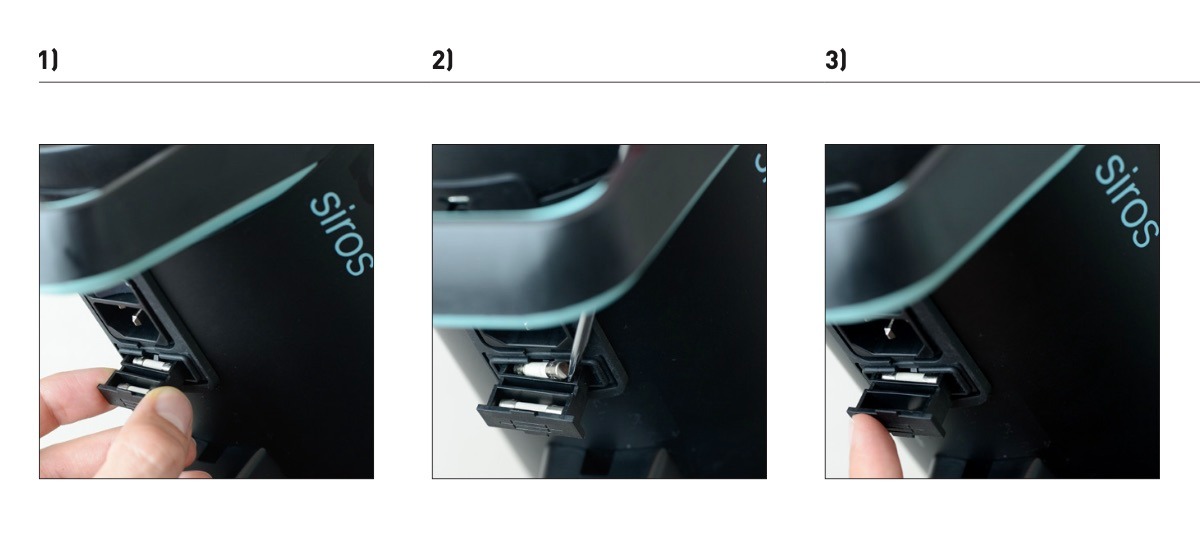
- Atjunkite tinklo kabelį nuo įrenginio (žr. 1 paveikslėlį aukščiau). Atidarykite saugiklių skyrių po įrenginiu.
- Atsargiai ištrauk sudegusią dagtį smailiu daiktu.
- Įstatykite pakaitinį saugiklį ir vėl uždarykite saugiklio skyrių
11.3. Šviesos formuotojų keitimas
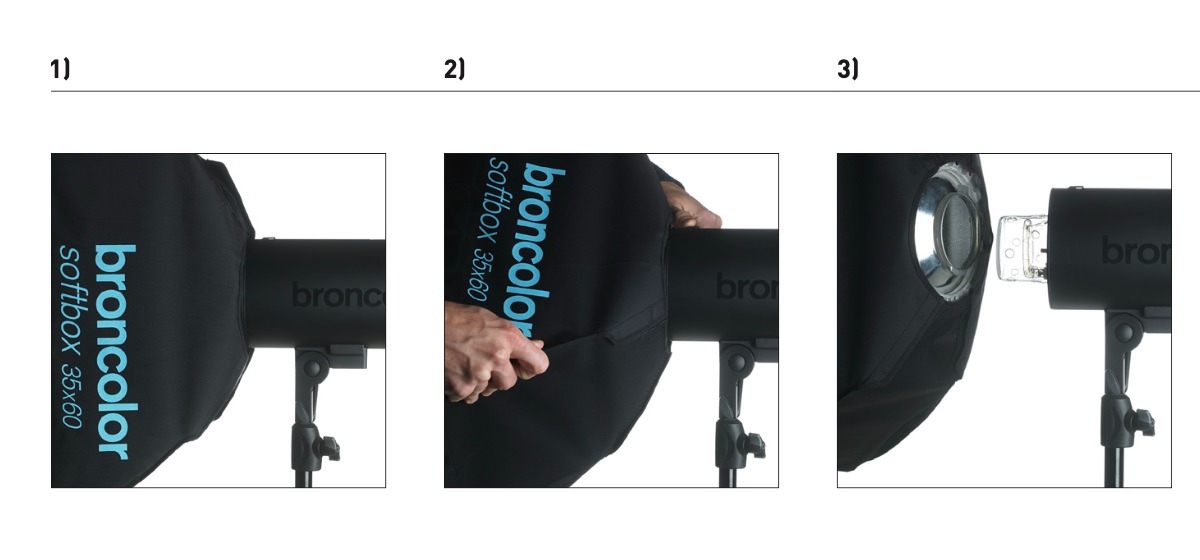
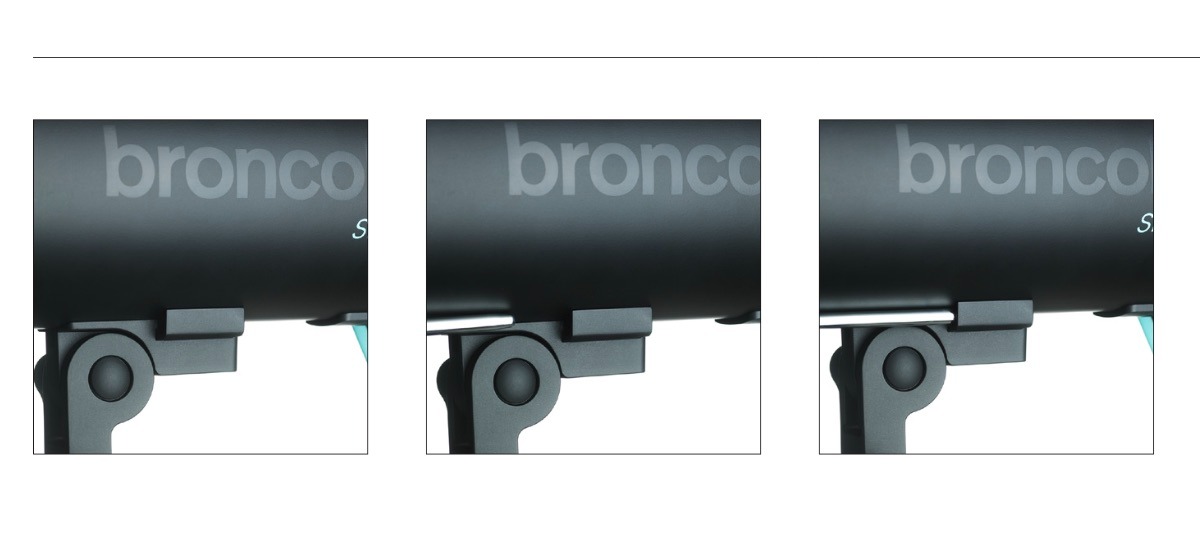
- Pasukite šviesos formuotoją abiem kryptimis iki jo sustojimo.
- Traukite atleidimo mechanizmą atgal ir tuo pačiu pasukite šviesos formuotoją, kol jis bus laisvas nuo bajoneto tvirtinimo.
- Atsargiai nuimkite šviesos formuotoją priekyje. Būkite atsargūs, kad nepažeistumėte apsauginio stiklo.
11.4. Skėčio uždėjimas
Norint pritvirtinti skėtį, reikia jį pritvirtinti po įrenginiu esančioje angoje.
12. Priedai
Siros suderinamas su visa Broncolor šviesos formavimo priemonių gama.
Šie daiktai yra specialiai rekomenduojami priedai:
13. Priežiūra ir remontas
Jūsų Broncolor monolight yra preciziškas prietaisas, galintis užtikrinti daugelio metų sklandų veikimą, jei tinkamai prižiūrimas. Tačiau jei įvyktų gedimas, prašome nebandyti atidaryti įrenginio ir taisyti jo patys. Net ir išjungus įrenginį, jame vis tiek gali būti pavojingas įtampos lygis. Todėl priežiūrai ir remontui visada siųskite įrenginį į savo Broncolor aptarnavimo punktą.
14. Aplinkos apsaugos informacija
Pasibaigus savo tarnavimo laikui, šis produktas negali būti utilizuojamas kaip įprastos buitinės atliekos. Vietoj to, jis turi būti nuvežtas į surinkimo punktą elektros ir elektronikos prietaisų perdirbimui. Medžiagos yra perdirbamos pagal jų žymėjimus. Pakartotinai naudojant, perdirbant ar naudojant senus prietaisus, jūs reikšmingai prisidedate prie mūsų aplinkos apsaugos.
Prašome kreiptis į savo vietos valdžios institucijas arba Broncolor pardavimų partnerį dėl tinkamos utilizavimo vietos.
15. Garantija
Visi Broncolor energijos blokai, lempos, monošviesos ir priedai gaminami pagal aukštą kokybės standartą. Broncolor siūlo dvejų metų gamyklos garantiją nuo pirkimo datos (pirmajam savininkui) minėtiems Broncolor produktams. Į šią garantiją neįtraukti blykstės vamzdeliai, halogeninės lempos, apsauginiai akiniai, laidai, baterijos ir tekstilė. Gedimai, atsirandantys dėl saugos instrukcijų nesilaikymo, netinkamo elgesio, kitų gamintojų priedų naudojimo, neleistino įsikišimo ar modifikavimo, nėra įtraukti į gamyklos garantiją. Broncolor / PhotoRobot neprisiima atsakomybės už žalą, atsiradusią dėl saugos instrukcijų nesilaikymo, netinkamo elgesio, kitų gamintojų priedų naudojimo ar neautorizuoto įsikišimo ar modifikavimo. Kilus techninių problemų, nedelsdami susisiekite su artimiausia įgaliota Broncolor degalinė. Produktų numeriai, produktų aprašymai ir tiekimo apimtis gali skirtis priklausomai nuo šalies. Dėl išsamesnės informacijos kreipkitės į savo Broncolor pardavimų partnerį. Išskyrus klaidas ir spaudos klaidas.
16. Pranešimas JK klientams
Šį įrenginį galima sukonfigūruoti prisijungti prie belaidžio LAN tinklo. Prašome sukonfigūruoti šį produktą jungtis prie saugios infrastruktūros. Nenaudokite konfigūracijos režimo įprastam veikimui.
- Pranešimai apie saugumo pažeidžiamumus: support@broncolor.swiss
- Reakcijos laikas: 30 dienų
- JK apibrėžtas palaikymo laikotarpis: 2 metai po pardavimo datos, taikomas tik produktams, parduotiems JK (išskyrus Šiaurės Airiją) nuo 2024 m. balandžio 29 d. ar vėliau
- Gamintojo pavadinimas: Bron Elektronik AG
- Gamintojo adresas: Hagmattstrasse 7, 4123 Allschwil, Šveicarija
17. Techniniai duomenys


EOS sukilėlių serija


EOS DSLR serija


EOS M serija be veidrodžių


"PowerShot" serija


Iš arti / delninis

"Canon EOS Rebel" serija siūlo pradedantiesiems pritaikytus DSLR fotoaparatus su tvirta vaizdo kokybe, intuityviu valdymu ir universaliomis funkcijomis. Šie fotoaparatai, idealiai tinkantys fotografijos entuziastams, užtikrina patikimą automatinį fokusavimą, įvairaus kampo jutiklinius ekranus ir "Full HD" arba 4K vaizdo įrašymą.
Ryšys
Skiriamoji geba (MP)
Rezoliucija
"Canon EOS DSLR" serija užtikrina aukštos kokybės vaizdus, greitą automatinį fokusavimą ir universalumą, todėl idealiai tinka tiek fotografijai, tiek vaizdo įrašų gamybai.
Ryšys
Skiriamoji geba (MP)
Rezoliucija
"Canon EOS M Mirrorless" serija sujungia kompaktišką dizainą su DSLR panašiu našumu. Šios kameros su keičiamais objektyvais, greitu automatiniu fokusavimu ir aukštos kokybės vaizdo jutikliais puikiai tinka keliautojams ir turinio kūrėjams, ieškantiems perkeliamumo neprarandant vaizdo kokybės.
Ryšys
Skiriamoji geba (MP)
Rezoliucija
"Canon PowerShot" serija siūlo kompaktiškas, patogias kameras atsitiktiniams šauliams ir entuziastams. Su modeliais nuo paprastų taškų ir fotografavimo iki pažangių priartinimo kamerų, jie užtikrina patogumą, tvirtą vaizdo kokybę ir tokias funkcijas kaip vaizdo stabilizavimas ir 4K vaizdo įrašas.
Ryšys
Skiriamoji geba (MP)
Rezoliucija
"Canon" stambiu planu ir rankiniai fotoaparatai yra skirti detaliam, artimam fotografavimui ir vaizdo įrašams. Kompaktiški ir paprasti naudoti, jie siūlo tikslų fokusavimą, didelės skiriamosios gebos vaizdą ir universalias makrokomandų galimybes – puikiai tinka vaizdams rašyti tinklaraščius, fotografuoti produktus ir kurti stambiu planu.


